Monday, February 26, 2018

The Best Laid Plans

Sometimes I just don't stay true to my SWAP plans.  There are many reasons why my plans change (I get bored, I can't find the pattern I was going to use originally, I can't find fabric to suit my ideas...), but in this case it turned out that the textured white sweater knit I was going to use for my planned project had much less yardage than I had originally anticipated.  In fact, it looks like I already hacked another project out of it.  I have no idea what the project was or when I did that, but the result is I didn't have enough fabric for the chosen project.

Photo credit:  M1357, My Image Magazine #7
I fell in love with the pattern M1357 from My Image Magazine #7 (fall/winter 2013/2014).  The magazine can be found here: Made by Oranges.


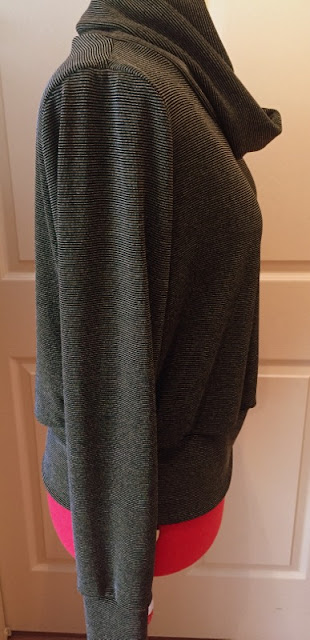
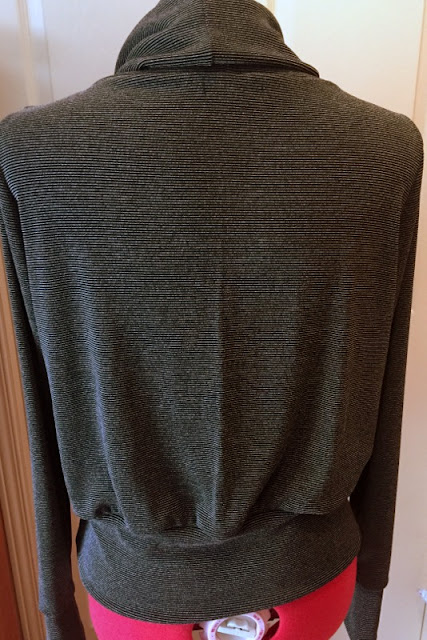
The sweater is a pretty basic sweater, with a lovely loose turtleneck, large cuffs at the wrists and is finished with a self-fabric bottom band.

In searching through my stash, I found a black super stretchy fabric (maybe a matte slinky - remember that stuff?!), with very fine taupe stripes.  It took me longer to trace the pattern off than it did to sew, and neither took very long to do.


I love the finished result.  I did a Nancy Zieman pivot and slide method of adding 1" to the bust instead of a traditional FBA (I didn't want a dart in this fabric).  I also added 2" in length to the sleeves.


Before I added the bottom band, I sewed the pieces together on one side and then wrapped it around my hips, marking where I wanted the final result to be.  I ended up whacking off about 10 cm in the width of the band to make it more fitted.  I would suggest doing this for each top you make from this pattern as all stretch knits behave differently.


I'm really happy with the final result.  So happy, in fact, I immediately cut out another one from a fabric I had just bought.


This fabric is a very open weave knit in a charcoal grey mix, with a bit more body than the "slinky" I used for the first one.  It kind of feels like a chenille fabric, but not as soft or as bulky.

I added about 5 cm to the length at the centre front, tapering it to nothing at the side seams to accommodate my bust volume, instead of only the width that the Nancy Zieman method FBA seems to add.


I will certainly need to wear a cami, tank or tee underneath this top as it is very showy otherwise, but I love the unusual fabric.
I think this is a cozy but lightweight sweater that will be great for the transition to spring.  If it ever arrives...that is.

Friday, February 23, 2018

FO - More Dots!

I've actually been scheduling time in m'Atelier this month.  As in, it's in pen in my paper calendar and bullet journal so it's an actual scheduled event I don't mess with.  Like, a lunchtime stress relieving appointment, or an after dinner appointment that I have to honour.   This means I've been getting a lot of sewing done.  Which is great, because I've made a rather lofty goal for myself to complete the SWAP I'm currently working on (you can read all about my plans here).

I love polka dots.  Sewing with polka dot fabric makes me very happy.  I found a black rayon blend lightweight crepe with white polka dot fabric on my stash and knew I just had to include it in my sewing plans.  I decided on a blouse using My Image magazine #12 M1612.   You can find the magazine on www.madebyoranges.com.

M1612 has back princess seams, with a yoke at the front shoulders and 3/4 length bell sleeves, which you can see in the line drawing above.  What the line drawing doesn't show is the soft gathers where the shoulder yoke joins the front.  When I was tracing the pattern, I wondered why the front piece seemed so much bigger than the yoke piece, but didn't notice the part about gathers until reading through the instructions.  Not that it would have changed my mind about making the blouse, but it's funny (weird) that the gathers aren't shown.  Anyway...here's the finished object:

I love it!  I chose white buttons.  Mostly because I had just used up all of my black ones in the right size, but also because I thought they were fun with the white polka dots.  The neckline is finished with self fabric bias binding, which I think is a really nice touch.


You can't see the princess seams on the back in the photograph, in fact, you can't really see them in person either, but they add really nice shaping to the blouse.  It's flowy, but not voluminous, which is how I prefer it. 


What are you sewing?  Any SWAP plans?

Monday, February 19, 2018

FO, Christine Jonson Patterns Travel Trio One, Center Seam Pants

I've been feverishly working away at my Queen of Dots SWAP plans.  With four items already finished, I'm using the momentum I'm gaining with the excitement of each finished object.  I was reminded of Christine Jonson Patterns by their recent pants sew-along in their Facebook group.  I have always liked Christine's patterns - Christine offers a wide range of paper patterns that work so well together.  A lot of these can now be purchased as a PDF as well.  Christine focuses on using knit fabrics for her patterns, and as a result her line of patterns makes the ideal solution for a travel wardrobe.  Spring is always a busy time for me, with a lot of travel for work to regional tradeshows.  My Queen of Dots SWAP was planned with these tradeshows in mind, which is why I included some knit separates.  My next choice was the Christine Jonson Travel Trio One, Center Seam Pants out of the same medium weight black ponte that the Christine Jonson Basewear Two Tapered skirt was made out of.


My measurements placed me in the size 16 waist and 14 hip, however, when I did the stretch test, I was worried the fabric wouldn't be stretchy enough.  I was hoping to avoid a compression legging/sausage casing style pant, and wanted more of a flared trouser style, so I sized up to size 18 for the waist and size 16 for the hip (and lower).  I scooped out/lowered the back crotch curve by about 1" to get rid of the standard wrinkling that I get pooling under my buttocks/at the tops of my hamstring area.  I also scooped out about 3/8" from the front crotch curve to get rid of the camel toe look I commonly get (so my crotch seam now looks more like a U than J).  I'm not sure that makes any sense, I can add some sketches to show you more details on this if you like - just let me know.  I also lengthened the pattern at the lengthen/shorten line by the knee by 6".

I made sure to carefully label each piece - right side/wrong side, as well as inner front/outer front vs. inner back/outer back.  I find when I'm sewing I end up not paying attention to these things and need visual reminders of what piece goes where.

I ended up taking in about an inch off of each side seam - this is consistent with the changes I had to make to the Tapered skirt, also from Christine Jonson Patterns, and also out of the same fabric.  In hindsight (see what I did there, lol), I should have all of the seams equally across the back.  As a result, my centre seams at the back are more on the side back than the centre back, but if anyone is looking that closely and comments on it, I'll have something else to say to them about what they're looking at ;)  I love how the yoke looks, but when I tried it on once I had sewn it together, the waist came up really high - around my natural waistline.  I have long legs (34" inseam for flats, 35-36" for heels), but I am also shortwaisted and dislike a seam line hitting me at the natural waist.  So, I lopped off the yoke and attached a stitch and turn elastic waist instead.  Maybe I should have called this SWAP The Queen of Lopping instead?!

I really like the finished pants.  They feel like very flattering secret pyjamas!  The weight of the ponte is great for a bootcut pant, and doesn't show every lump and bump!  You'll have to take my word for it because right now I only have these photographs to show you.


Taking photographs is quite difficult for me.  I don't have access to a photographer, I'm a bit lazy about taking my own pictures and end up using my cell phone camera at night.  The lighting in my Atelier is not so great during the day, and even worse at night.  I hope to take some pictures later this week with a better camera, a tripod, and in a different location during the day so you can actually see how these pants fit me.  But until then, you'll have to make do with these photos.

Up next on the sewing table:


Friday, February 16, 2018

Failure in Greyscale

I start off all of my sewing projects with such high hopes.  I usually have a pretty clear vision of the outcome in my mind, but sometimes things don't go as you plan.  I would like desperately need some new loungewear.  I love Olivia Pope's loungewear and aspire to create some new garments similar to hers - luxurious, flowy, soft and elegant over the crazy printed flannel pants and a fleece sweatshirt I currently now turn to.

One of my #makenine2018 goals is the Toaster Sweater by Sew House Seven.  I originally was thinking of the #1, but when I searched through my patterns, I realized I only had purchased #2.  So, I decided to use that one instead.  I used a medium weight heathered light grey French terry from my stash - it's deep stash (when I think about it, I probably purchased it more than 10 years ago) and I have no idea where it came from.  I added an 1" to the length of the sleeves, but otherwise made it as per the original pattern in a size large.  I used a light pink thread, mostly because I was lazy and it was what was on my sewing machine and serger, but it turned out to add a neat touch (in my opinion anyway).

Here's the result.

Toaster Sweater #2 - Front
Toaster Sweater #2 - Back

Toaster Sweater #2 - Side view
Doesn't look too bad, right?  Well, when I put it on...let's just say this is why I want to make a direct copy of my body for a dressform.  I am much more well endowed than the dressform and as a result, when I wear the top it juts out from my bust level and sort of hangs weirdly straight down.  Like a tent.  Or a short mumu.  Not Olivia Pope-esque at all.  I really should have done a FBA and sized down a little for the front and back pieces of this but again, lazy.  Other than that, I do like this pattern.  The funnel neck is cozy but not restricting like a turtleneck can be.  The side vents are also a lovely feature, as is the back hemline being lower than the front hemline.  I'll still wear this, but it won't see the light of day.

Let's move on to the pants of this outfit.  I used the Hudson Pant, View A in size 12.  I've made these a few times before, and love the versions I made previously.  Here's the result of my current attempt:


Looks good, right?  Well...for whatever reason, I totally ignored the "this pattern is drafted for a woman of 5'5" with a 28" inseam" line that is VERY. CLEARLY. WRITTEN. in the pattern instructions.  I am not 5'5", nor do I have  28" inseam.  I am, in fact, 5'9" with a 34" inseam.  I bet you can guess the outcome of this...THE PANTS ARE WAY TOO SHORT.  I don't know what I was thinking.  Nor do I know why I didn't make any notations on my traced copy of the pattern that I used two or three times already or even why I didn't adjust the actual pattern piece itself!  I can (and will) cut the cuffs off and make them into view B, which is the capris version.  But that means it's not the snuggly warm version I was looking for to wear NOW.


There you have it.  Failure in greyscale.  Back to the drawing board.


Monday, February 12, 2018

FO - I Heart Me!

I hate the commercialization that holidays of any kind have turned into.  Valentine's Day was the one of the first holidays to turn into a marketing blitz.  And being single on Valentine's Day makes my "inadequacies" glaringly more apparent.  Instead of a pity party, I've decided to take Valentine's Day on, head on.  Combine that thinking with the fact that I've been binge-sewing lingerie lately, and I came up with  the idea of celebrating ME in all my oneness by making myself a cute new lingerie set.  Or two.  Actually, I made three.

My goals this year include making 12 bras (see my 2018 Goals post here), and that has got my lingerie designing thinking cap on!  The ideas are just swirling around in my brain.  Where can I put lace, where do I use lining, what elastic do I have, how can I incorporate that special piece of whatever.  I have a ton of beautiful kits from Merckwaerdigh that have taken up residence in one of my stash bins (I can buy faster than I can sew!!), and want to use them.  For the first set, I wanted something that would something fun and cute.  A quick search through my stash turned up this kit:


I used the Bolyston Bra pattern from Orange Lingerie for the bra, which I've used before.  Now that I've fine-tuned the fit, it sews up quickly.  The part that takes the longest when I'm making a new bra is now the designing phase, where I try to figure out where I"m going to put which fabric, lace and elastic!  I used some of the elastic from the kit, and some from my stash, and I used foam for the cups from Bramaker's Supply.

Here's the finished bra:

I also made a pair of panties from the "leftover" fabric in the kit.  I used the Gabriella Knickers pattern by Evie la Luve.  It doesn't seem to be available anymore, but the pattern cover looks like this:
Mine look like this:


For bra #2 in my Valentine's celebration making frenzy, I made another Bolyston bra from yet another kit from Merckwaerdigh.  I wanted this one to be more feminine than cute.  It turned out very pretty, I think.  I used the stretch lace in the kit directly over the foam cups, without any lining.  I finished the tops of the foam cups with fold over elastic.  I used the plain, but very stretchy, cream colour spandex that came in the kit for the frame and bridge, but I used the stretch mesh over top of the spandex (instead of as a lining). I decided to cut the stretch mesh with the direction of stretch going in the opposite direction from the spandex to add a bit more support.  I added some pieces of the stretch lace at the side of the frames for added interest.  The bands are cut from power mesh to provide more support. 


I made a pair of Esme panties from Evie la Luve with the stretch lace back to match this bra, but the photograph of them seems to have disappeared.  I'll have to edit this post to put in a pic when I've had a chance to gather all the photography gear again.

And one more Bolyston bra set, this one from another kit from...you guessed it...Merckwaerdigh.  This one is definitely Valentine's themed in RED.


 The stretch lace in the kit has some brown accents, which are echoed in the elastics, also from the kit.  I went with the self-fabric strap on this version, which is as the pattern.  The foam I used for this bra came from Bramaker's Supply.  It is a bit softer than the foam I've used previously (you can see that in the photograph below), but I don't know how it wears.  I bought it mostly because it is red.  I finished the top of the foam cups with fold over elastic as well.

The panties are the Giselle Ruched Panties from Ohhh Lulu.  You guys!!  I love these - I made the size large based on my measurements, and they fit amazingly well (which you'll just have to take my word of, because I'm not ready to display my bootie on the 'net in all it's glory).  The ruching is such a pretty feminine touch, and I love it!  I cut the front piece from the stretch lace that was included in the kit.  The elastics were also leftover from the kit, with the exception of the one I used for the back ruching - that came from stash.

As an aside - I'm struggling with photographs for the blog.  I know I can do better.  I've even started pulling out my fancy DSLR, taking photographs at lunch time to take advantage of natural light, as well as running the photos through a photo editing software, but when you start with crappy lighting, well, you end up with a not so great photograph.  I've done everything in my power (currently, that is, without investing in some new lights for the studio, or a course in digital editing) to get a better photograph.  As a result, this colour red isn't really true to life.  But, you get the idea.  I've been having fun sewing a lot of new lingerie for myself. 

I'm saving the red set for it's debut on the 14th.  So if I see you then, you'll know what I've got on underneath!! ;)

Friday, February 9, 2018

January Goals Check In

January. The month often faulted to be the let down month after the holidays, known for Blue Monday.  This January has seen ups and downs for me, particularly because for a good part of January, I was stuck indoors battling the frigid temperatures we've experienced this month.  Shack-wacky as my daughter's boyfriend calls it.  That being said, being indoors during awful weather isn't so bad.  I've been hunkering down in my sewing room, creating, as well as knitting up a storm.  Or through the storm...Ha.  I make myself laugh.  Ahem.  Anyway.

Here were my goals for January and how I fared:

Knitting

1.  Finish Autumn Woods socks - first sock is finished, casting on the second pair today. Done!  Even the ends are woven in, and photographs are up on Ravelry!
2.  Finish Rikke hat.  Done!! I've been wearing this soooo much - its so soft and squooshy, I love the colours.  Handspun for the win!
3.  Finish Henry the Chipmunk.  All I have to do is the eyes, but for whatever reason it's been sitting on my shelf not finished for A-G-E-S.  Nope, gah.  Some day...for now he's sitting on my shelf in my office, judging me, still eyeless.
4.  Machine knit a sweater for Deklan (my grandson)   I didn't pull out the knitting machines, but I'm well on my way through the Sheepish Little Sweater as a hand knit, and I'm loving it! Sleeves on baby sweaters aren't the black hole they are on adult sweaters!  One more to go!
5.  Chose and spin one braid from my stash.  Nope - the spinning wheels are sitting, collecting dust in my living room.

Sewing

1.  Sew another Boylston bra (kind of cheating since this is already cut out and ready to sew) Done!  In fact, I made several!
2.  Sew a Fenway bra I haven't sewn a Fenway bra - I started.  I chose some fabric that I wouldn't be heartbroken to lose if it doesn't work out.  But then I realized I needed some supplies to make it a decent looking wearable muslin should it actually work out, so I'm working on collecting those before I can get into the sewing.  I sewed a couple more Bolyston Bras instead
3.  Chose a pattern from Burda magazine for lounge wear (I change every evening after dinner to flannel pants, and I think it's time to upgrade). I did sew some lounge wear but I didn't use a Burda pattern for it.  So half accomplished maybe?
4.  Plan and post my late Winter/early Spring SWAP plans. Done!
5.  Trace and sew one Toaster sweater. Done!  I'm not 100% happy with how it turned out, but it's wearable and cozy.

Reading

1.  Finish King's Crossing by Christine Kling Done!
2.  Finish Crucial Conversations  I haven't finished this, but am continuing to read this
3.  Finish You, Inc. I haven't finished this one either, but am still working through it.  
4.  Chose next fiction book  I've read a few this month actually.  I am currently in the midst of Life Mask by Emma Donoghue.  I'm having trouble getting into this one but it could be because I've been exhausted at the end of long days when I try to read it.
5.  Start reading Tribe of Mentors by Timothy Ferris  haven't started yet...
6.  Start reading Leaning In (received this one for Christmas from my Dad) also haven't started yet.


Health/Fitness

I've changed this title from original title of Physical Health/Fitness, because I need to pay attention to my emotional health and mental health too.

1.  Yoga with Adriene at least 3x/week. Well...it's been close to three times a week, but only because I was gently scolded by my chiropractor about getting back to stretching.  I've had some old aches and pains flare up this month, and have only been doing yogic stretches, not really a flow or power yoga I want.  Baby steps.
2.  Go to bed at 10 pm. Do you ever notice that when you state your plans, sometimes it just absolutely goes in the opposite direction?  I was lucky to see 11 pm for a bed time this month, and that's on the really late side for me!
3. Decrease alcohol intake during the week. Yeah, I decreased it.  Not by much, but it's a step in the right direction.  And I feel less guilty about my alcohol intake and absolutely enjoy the drink I do have.
4.  Meditate 3x/week.  I'm trying out a few new routines.  Like sitting in my office and quietly contemplating before I start my day.  So far, it works as long as I don't look at the email first.  Or get a phone call right away. I have the attention span of a gnat.  That's why it's called a practice!

Goals for February

Knitting

1.  Start and finish the personal sock club (PSC) sock for February
2.  Work on the Mackenzie sweater
3.  Spin one braid/bump/batt
4.  Finish the Sheepish Little Sweater for Deklan
5.  Start and finish birthday socks for Mom and choose the birthday socks for Dad

Sewing

1.  Sew a Fenway bra and pantie set
2.  Chose and sew one Burda pattern from the January 2018 issue (can't wait to try the yoga top and leggings!)
3.  Continue sewing Queen of the Dots SWAP items

Reading

1.  Finish reading Crucial Conversations
2.  Finish reading Life Mask by Emma Donoghue
3.  Start Leaning In
4.  Start the next book in the Libermann Papers series by Frank Tallis
5.  Start High Performance Habits by Brendon Burchard

Health/Fitness

1.  Get at least 7 hours of sleep at night.  Go to bed by 10 pm.  Try, try, try!  Sleep often loses out to sewing or knitting for me, but I'm so much better when I get enough sleep!
2.  Continue with yoga 3x/week in the mornings
3.  Meditate daily, every morning
4.  Move my body outdoors at least 3x/week.  Life for me is better when I get outside!


Monday, February 5, 2018

RAWRRRR!!! A FO

I was able to carve out some time in my Atelier this weekend (sounds so much better than sewing room in the basement, doesn't it?!), and finished a few more items for my Queen of the Dots SWAP.  When I sew my SWAPs, I try to do a bit of "production" sewing by sewing all of the items that use the same colour thread one after the other before changing out the thread.  My last FO (finished object) was the Image Wear 1002 top, which used red thread, so up next I decided to do the Agnes Top in the red leopard? animal print? brushed lightweight sweater knit fabric.

I got this fabric at my local Fabricland last week when I was shopping for the items for my daughter's pink dress.  Now, I *know* I'm aiming for the goal of only intentionally buying fabric (as in, something I have researched or planned rather than simply seeing it and purchasing it), but red.leopard.print.  Com'on!
Anyway...two meters came home with me for the Tilly and the Buttons Agnes tee. I have made the Agnes Tee quite a few times already, and it's a very straight forward sew that I can whip up in about two hours, including the cutting time.  My adjustments include a 3/4" swayback adjustment, adding 1" to the length of the sleeves and widening the sleeve from the elbow to the wrist, adding about 1/2" on each seam to make it a bit wider at the wrist.  I find on some of my earlier versions that were made without this adjustment I can't pull up my sleeves, which I like to do often.

When I finished that top, I took another look at my SWAP plans and one of my extras included a red Blackwood Cardigan by Helen's Closet.  I've also made three or four of these previously and they get a lot of wear.  They are cozy, yet make me feel put together.  I cut this version out of the left-over yardage I had in a medium weight red sweater knit, also from Fabricland but a long time ago.  I added about 2" to the centre front from just over the bust all the way down to the hem, to make it close a little more over my chest.  I also made my typical 3/4" swayback adjustment.  Other than that, it's pretty close to the pattern as printed.  The hardest part about this particular sweater was working within the confines of the piecemeal yardage I had, but I was determined to get this sweater out of it!

Reviewing my plans showed that I don't have much in the way of red items left for the main portion of my SWAP, so I switched out my threads to black for the next phase of sewing.

I cut and stitched a black ponte skirt made from the Basewear Two pattern by Christine Jonson patterns.  It was a super fast - I mean really super fast.  Two side seams, elastic waist and a hem.  Based on my measurements, I am a size 16 hip and 18 waist. I sized up to a 18 waist and 20 hip, because when I did the stretch test, the ponte seemed to have less give than what the pattern called for.  I ended up cutting it down when I tried it on for my first fitting before adding the elastic at the waist - it's probably a size 14 waist and 12 hip.  Even with the fitting snaffoo, its still a super simple and very quick make, made in about an hour (including cutting time).


Here's a recap of my Queen of the Dots wardrobe so far:

Thursday, February 1, 2018

Queen of Dots, an Dotted FO!

For my second item for the Queen of Dots wardrobe, I decided to sew the top from Image Wear 1002.  Image Wear is a printed pattern line by Made by Oranges, who also publish the Image Wear magazine.   I'm pretty sure I got this pattern for free when I bought one of their magazine packs of back issues.


I really like the pattern photograph - bows are still a big trend and I thought it would work really well with the lightweight crepe I had chosen for this pattern.  The pattern pieces are given on a pattern sheet that looks like a Burda Style magazine pattern sheet.  I traced the size 42 based on my measurements, and made my standard adjustments, which are a 3/4" dartless FBA (from the Fast Fit book by Sandra Betzina), a 3/4" swayback adjustment, and adding 1" to the sleeve length. There are no seam allowances included on these pattern pieces, which makes the alterations a bit easier to manipulate.

The bow and collar are two separate items on this blouse, not a continuous collar that you tie in the front.  As with many European patterns, the pieces for the collar and bow are given as dimensions you need to cut out, no physical pattern piece is given.  The layout diagram shows the collar and bow being cut on the cross-grain.  I briefly considered how the collar would look as I didn't think it would drape around the curve of the neckline very nicely if it was cut on the cross-grain.  That being said, I also figured the pattern drafters would know better so I ignored the niggling feeling I had about the collar and plowed ahead.  

I'm pretty sure you know where this is going.  Here's what happened when I attached my collar.  


Not the look I was going for.  I tried folding it under like a facing or binding, but it puckered the body of the blouse like mad.  I unpicked it and restitched it with a different method and had the same result.  So I hacked off the collar, tossed it in the bin and used commercially made single fold narrow bias tape to finish it instead.

The rest of the construction was easy.  Initially, I decided to leave off the bow given the issues I had with the collar but then decided to finish the bow, and attach it with a safety pin like a brooch for a removable accessory.  It gives me some flexibility and I can also use the bow on other pieces of my SWAP if I like. 
If I make this again, I will draft collar pieces either to be cut on the bias or use a facing instead.  I really like the blouson effect that the elastic finish at both the lower hem and the wrists gives.  I think it's a pretty, feminine touch.

This will go well with the remainder of my planned Queen of Dots SWAP wardrobe.  More to come!