Showing posts with label sewing. Show all posts

Thursday, February 7, 2019

February Goals

I'm not sure how enticing my goals posts are to the general public, but I really find them helpful for me to be accountable to anyone who reads my posts.  So, I'm going to continue on with them.  I'm not going to go back to my last goals post since it was so long ago, nor will I do a recap of my 2018 goals for the year.  I'll just jump in and outline my goals for February 2019.

Sewing & Quilting

  1. Finish Warm Winter Sudoku wardrobe
  2. Plan the next capsule wardrobe - this one will be an athletic wear wardrobe
  3. Finish Baby Girl F's (my granddaughter!) Mermaid Quilt and crib sheets
Knitting & Spinning
  1. Finish M'Agatha sweater - this would be perfect to coordinate as an extra with my Warm Winter Sudoku Wardrobe!
  2. Finish the orange baby sweater for Baby Girl F
  3. Finish last pair of 2018 socks
  4. Start Monkey Socks
  5. Knit a pair of socks for my grandson, Deklan
  6. Finish Deklan's Toronto Maple Leafs sweater
  7. Sew together Augusta cardigan and finish!  This would also coordinate really well with my Warm Winter Sudoku Wardrobe!
  8. Spin 15 minutes a day (when I'm not travelling)

    Reading

    1. Finish current Bruno, Chief of Police, Book #2 by Martin Walker - I am absolutely loving these easy to read novels about Bruno, a former solider turned police chief in St. Denis, France.  
    2. Start & finish Bruno, Chief of Police, Book #3 by Martin Walker
    3. Start Bruno, Chief of Police, Book #4 by Martin Walker
    4. Finish 9 Minutes on Monday by James Robbins
    5. Choose next business book to read
    Health
    1. Continue cycling training program.  This includes cycling four-five days per week (I'm currently using a pretty plain-Jane stationary bike I bought in mid-December).  I'm finding the biking really boring, but try to make it more exciting by using the time to catch up on video podcasts.  I'm loving how strong I'm already starting to feel.
    2. Aim to be in bed by 10 pm, lights out by 10:30 pm 
    There you have it, February goals.  Let's see how hard I can crush these!

    Monday, February 19, 2018

    FO, Christine Jonson Patterns Travel Trio One, Center Seam Pants

    I've been feverishly working away at my Queen of Dots SWAP plans.  With four items already finished, I'm using the momentum I'm gaining with the excitement of each finished object.  I was reminded of Christine Jonson Patterns by their recent pants sew-along in their Facebook group.  I have always liked Christine's patterns - Christine offers a wide range of paper patterns that work so well together.  A lot of these can now be purchased as a PDF as well.  Christine focuses on using knit fabrics for her patterns, and as a result her line of patterns makes the ideal solution for a travel wardrobe.  Spring is always a busy time for me, with a lot of travel for work to regional tradeshows.  My Queen of Dots SWAP was planned with these tradeshows in mind, which is why I included some knit separates.  My next choice was the Christine Jonson Travel Trio One, Center Seam Pants out of the same medium weight black ponte that the Christine Jonson Basewear Two Tapered skirt was made out of.


    My measurements placed me in the size 16 waist and 14 hip, however, when I did the stretch test, I was worried the fabric wouldn't be stretchy enough.  I was hoping to avoid a compression legging/sausage casing style pant, and wanted more of a flared trouser style, so I sized up to size 18 for the waist and size 16 for the hip (and lower).  I scooped out/lowered the back crotch curve by about 1" to get rid of the standard wrinkling that I get pooling under my buttocks/at the tops of my hamstring area.  I also scooped out about 3/8" from the front crotch curve to get rid of the camel toe look I commonly get (so my crotch seam now looks more like a U than J).  I'm not sure that makes any sense, I can add some sketches to show you more details on this if you like - just let me know.  I also lengthened the pattern at the lengthen/shorten line by the knee by 6".

    I made sure to carefully label each piece - right side/wrong side, as well as inner front/outer front vs. inner back/outer back.  I find when I'm sewing I end up not paying attention to these things and need visual reminders of what piece goes where.

    I ended up taking in about an inch off of each side seam - this is consistent with the changes I had to make to the Tapered skirt, also from Christine Jonson Patterns, and also out of the same fabric.  In hindsight (see what I did there, lol), I should have all of the seams equally across the back.  As a result, my centre seams at the back are more on the side back than the centre back, but if anyone is looking that closely and comments on it, I'll have something else to say to them about what they're looking at ;)  I love how the yoke looks, but when I tried it on once I had sewn it together, the waist came up really high - around my natural waistline.  I have long legs (34" inseam for flats, 35-36" for heels), but I am also shortwaisted and dislike a seam line hitting me at the natural waist.  So, I lopped off the yoke and attached a stitch and turn elastic waist instead.  Maybe I should have called this SWAP The Queen of Lopping instead?!

    I really like the finished pants.  They feel like very flattering secret pyjamas!  The weight of the ponte is great for a bootcut pant, and doesn't show every lump and bump!  You'll have to take my word for it because right now I only have these photographs to show you.


    Taking photographs is quite difficult for me.  I don't have access to a photographer, I'm a bit lazy about taking my own pictures and end up using my cell phone camera at night.  The lighting in my Atelier is not so great during the day, and even worse at night.  I hope to take some pictures later this week with a better camera, a tripod, and in a different location during the day so you can actually see how these pants fit me.  But until then, you'll have to make do with these photos.

    Up next on the sewing table:


    Monday, February 5, 2018

    RAWRRRR!!! A FO

    I was able to carve out some time in my Atelier this weekend (sounds so much better than sewing room in the basement, doesn't it?!), and finished a few more items for my Queen of the Dots SWAP.  When I sew my SWAPs, I try to do a bit of "production" sewing by sewing all of the items that use the same colour thread one after the other before changing out the thread.  My last FO (finished object) was the Image Wear 1002 top, which used red thread, so up next I decided to do the Agnes Top in the red leopard? animal print? brushed lightweight sweater knit fabric.

    I got this fabric at my local Fabricland last week when I was shopping for the items for my daughter's pink dress.  Now, I *know* I'm aiming for the goal of only intentionally buying fabric (as in, something I have researched or planned rather than simply seeing it and purchasing it), but red.leopard.print.  Com'on!
    Anyway...two meters came home with me for the Tilly and the Buttons Agnes tee. I have made the Agnes Tee quite a few times already, and it's a very straight forward sew that I can whip up in about two hours, including the cutting time.  My adjustments include a 3/4" swayback adjustment, adding 1" to the length of the sleeves and widening the sleeve from the elbow to the wrist, adding about 1/2" on each seam to make it a bit wider at the wrist.  I find on some of my earlier versions that were made without this adjustment I can't pull up my sleeves, which I like to do often.

    When I finished that top, I took another look at my SWAP plans and one of my extras included a red Blackwood Cardigan by Helen's Closet.  I've also made three or four of these previously and they get a lot of wear.  They are cozy, yet make me feel put together.  I cut this version out of the left-over yardage I had in a medium weight red sweater knit, also from Fabricland but a long time ago.  I added about 2" to the centre front from just over the bust all the way down to the hem, to make it close a little more over my chest.  I also made my typical 3/4" swayback adjustment.  Other than that, it's pretty close to the pattern as printed.  The hardest part about this particular sweater was working within the confines of the piecemeal yardage I had, but I was determined to get this sweater out of it!

    Reviewing my plans showed that I don't have much in the way of red items left for the main portion of my SWAP, so I switched out my threads to black for the next phase of sewing.

    I cut and stitched a black ponte skirt made from the Basewear Two pattern by Christine Jonson patterns.  It was a super fast - I mean really super fast.  Two side seams, elastic waist and a hem.  Based on my measurements, I am a size 16 hip and 18 waist. I sized up to a 18 waist and 20 hip, because when I did the stretch test, the ponte seemed to have less give than what the pattern called for.  I ended up cutting it down when I tried it on for my first fitting before adding the elastic at the waist - it's probably a size 14 waist and 12 hip.  Even with the fitting snaffoo, its still a super simple and very quick make, made in about an hour (including cutting time).


    Here's a recap of my Queen of the Dots wardrobe so far:

    Thursday, February 1, 2018

    Queen of Dots, an Dotted FO!

    For my second item for the Queen of Dots wardrobe, I decided to sew the top from Image Wear 1002.  Image Wear is a printed pattern line by Made by Oranges, who also publish the Image Wear magazine.   I'm pretty sure I got this pattern for free when I bought one of their magazine packs of back issues.


    I really like the pattern photograph - bows are still a big trend and I thought it would work really well with the lightweight crepe I had chosen for this pattern.  The pattern pieces are given on a pattern sheet that looks like a Burda Style magazine pattern sheet.  I traced the size 42 based on my measurements, and made my standard adjustments, which are a 3/4" dartless FBA (from the Fast Fit book by Sandra Betzina), a 3/4" swayback adjustment, and adding 1" to the sleeve length. There are no seam allowances included on these pattern pieces, which makes the alterations a bit easier to manipulate.

    The bow and collar are two separate items on this blouse, not a continuous collar that you tie in the front.  As with many European patterns, the pieces for the collar and bow are given as dimensions you need to cut out, no physical pattern piece is given.  The layout diagram shows the collar and bow being cut on the cross-grain.  I briefly considered how the collar would look as I didn't think it would drape around the curve of the neckline very nicely if it was cut on the cross-grain.  That being said, I also figured the pattern drafters would know better so I ignored the niggling feeling I had about the collar and plowed ahead.  

    I'm pretty sure you know where this is going.  Here's what happened when I attached my collar.  


    Not the look I was going for.  I tried folding it under like a facing or binding, but it puckered the body of the blouse like mad.  I unpicked it and restitched it with a different method and had the same result.  So I hacked off the collar, tossed it in the bin and used commercially made single fold narrow bias tape to finish it instead.

    The rest of the construction was easy.  Initially, I decided to leave off the bow given the issues I had with the collar but then decided to finish the bow, and attach it with a safety pin like a brooch for a removable accessory.  It gives me some flexibility and I can also use the bow on other pieces of my SWAP if I like. 
    If I make this again, I will draft collar pieces either to be cut on the bias or use a facing instead.  I really like the blouson effect that the elastic finish at both the lower hem and the wrists gives.  I think it's a pretty, feminine touch.

    This will go well with the remainder of my planned Queen of Dots SWAP wardrobe.  More to come!


    Monday, January 29, 2018

    Twisted, a FO

    A while back, I found a new to me pattern company.  Don't cha just love the internet?  Made by Oranges is a company based in the Netherlands, who publishes My Image, a semi-annual magazine with patterns for women. I have collected all of their issues over the past year or so.  Shipping from the Netherlands to Canada is relatively quick (about two weeks or so), and I haven't been any trouble with either the Canada Post or customs.  I've just resubscribed for the coming year, as well as purchased a subscription for B*Trendy, the children's pattern magazine they also publish.

    The patterns in the magazines need to be traced the same as Burda Style magazine, which can be a bit confusing, but I highlight each pattern piece with a highlighter before tracing to make it less confusing.  I also place a bright work light directly over my work space when I'm tracing (and wear my reading glasses!).  The directions are just as brief as Burda magazines, but come in four languages. However, the lovely clothing with a touch of European flare make it totally worth all of this.  And, the glossy photographs of the clothes made in a number of different fabrics are well worth the purchase price.

    This is my first Queen of the Dots SWAP piece.  Item #10 (Top #5) as noted in my previous post is My Image magazine #15, M1760 twist top in lightweight mustard heather jersey knit.  This fabric came from Fabricland (not sure if it was my local store or one I bought in a huge haul last October in Ottawa).  I've sewn this fabric up in other colourways previously, and it is lovely to wear, albeit a bit sheer.  I felt it would be perfect for the twist in this pattern.


    I chose size 42 based on my measurements.  I made a 3/4" swayback adjustment, which is a standard adjustment for me, and graded the waist shaping out to accommodate my figure. I also added 1" to the length of the sleeves.

    The challenging part of this pattern is obviously figuring out what the directions meant for the twisted part.  I was sewing in the evening after a taxing day, and it took me a few tries to figure out what the instructions meant, despite the drawings that are included for this pattern.  I did eventually figure it out by bringing the top over to the dress form and draping it this way and that. Once I got that figured out, I couldn't figure out how I was supposed to finish the portion of the top front and ripped a small hole during the stitching/unstitching/restitching process.  Fortunately, the hole was covered when I finally did figure out what I was supposed to do.  Next time, I'll add a bit of a wedge through this area to accommodate an FBA.


    The body of the top ended up being quite long on me.  I cut off 2-1/2" from the length of the body.  I guess being able to cut off the length isn't a hardship, it's just an uncommon practice for me with my long legs and arms :p

    I love the result.  I would love to make this top again, but as it is pretty distinctive, I won't make it again in this SWAP capsule.

    Thursday, January 25, 2018

    Queen of Dots, a dotty SWAP

    If you follow me on Instagram, you’ll have noticed a recent post of fabrics that I’ve pulled as a result of a stash toss (and maybe some recent purchases...ahem...).   In order to combat the winter blahs and the recent Blue Monday, I’m planning a late winter/early spring wardrobe for myself.  It’s definitely winter here right now, with cold temperatures and lots of snow/sleet/freezing rain. Usually, thoughts of spring have me dreaming of softer colours, like coral, turquoise and white, but for some reason I’m drawn to a dramatic wardrobe of red, mustard, black and grey.  Maybe I’m just not quite ready for spring yet? (Haha)

    These are the fabrics I’ve pulled from my stash.  I love me my SWAP wardrobe (for the uninitiated, SWAP stands for Sewing With A Plan).  I spend hours dreaming about SWAPs, planning SWAPs,  sketching SWAPs, pulling fabrics for SWAPs from my stash, and buying fabric for SWAPs.

    I typically plan around a SWAP core wardrobe, which I found in the Australian Stitches magazine series years ago (mid-90s /early 2000s maybe?)   I still have ALL of the original magazines that these articles were published in.  Each article added a few more clothing items to the author's wardrobe, which ended up being extremely wearable and very cohesive.  I travel a lot for both work and pleasure, and love that I can pack very quickly with a well planned wardrobe.


    The core SWAP wardrobe I usually start with consists of:
    1. Jacket, typically in a simple style such as a cardigan jacket
    2. Pants #1
    3. Pants #2
    4. Skirt #1 in a solid colour
    5. Skirt #2 in a print or check
    6. Top #1
    7. Top #2
    8. Top #3
    9. Top #4
    10. Top #5
    11. Top #6
    The tops are a mix of coordinating solids and prints, one of which should match Skirt #2 for a dress look.

    And here are my plans for the my SWAP.  Ignore the numbers associated with the items in my sketches as  the plans have already been revised a few times.  A few of the sketched items are from my existing wardrobe as well, so you won't see them in my sewing plans, and some of them are also noted below as Extras.


    The Queen of Dots, a dotty SWAP
    1. Jacket - short fitted collarless jacket in stone and black Prince of Wales stretch suiting
    2. Pants #1 - Closet Case Sasha Trousers in stone and black Prince of Wales stretch suiting
    3. Pants #2 - Christine Jonson Travel Trio One Centre Seam Pant in black ponte
    4. Skirt #1 - self drafted pencil skirt in stone and black Prince of Wales stretch suiting
    5. Skirt #2 - Christine Jonson Basewear Two skirt in black ponte
    6. Top #1 - My Image magazine #12 M1612, black crepe with white polka dots
    7. Top #2 - Butterick 5526 princess seam shirt, white crepe with black polka dots
    8. Top #3 - My Image ImageWear IW1002 blouse with bow at neckline in red crepe with black polka dots (see why it's called Queen of  Dots?!)
    9. Top #4 - Tilly & the Buttons Agnes Top with scoop neck and plain sleeves in red, black and tan leopard print brushed lightweight sweater knit
    10. Top #5 - My Image magazine #15 M1760 twist top in mustard heather jersey knit
    11. Top #6 - My Image magazine Fall/Winter 2013/2014 M1357  turtleneck sweater in white textured sweater knit

    As is true for me when planning any SWAP, I have trouble limiting myself to only these items. That being said, I sew a lot with a high output of finished garments. #notbragging  #sorrynotsorry In fact, I make 99% of my own clothing.  I also own A LOT of fabric.  And I'm dotty to think I'll be able to focus long enough to get all these pieces finished before spring.  All that leads to my dream wardrobe to include the following items that I affectionately call "Extras".


    1. Vogue 7827, view B flutter sleeve top, black georgette with tiny polka dot
    2. Sew Over It Ella Blouse, red herringbone print crepe
    3. My Image blouse with gathers at centre front neckline, Red, beige and black print crepe 
    4. Sewaholic Renfrew top, view C with cowl, Black print lightweight sweater knit 
    5. My Image Spring/Summer 2015 M1504 shirt, short sleeves with draped neckline, ITY jersey in black, beige, red and cream print 
    6. Sew Over It Molly Top, ITY jersey in black, beige, red, blue and cream print 
    7. cowl neck top or wrap top, black lightweight rayon/lycra jersey 
    8. Helen’s Closet Blackwood Cardi, long version, red sweater knit 
    9. Muse Patterns, Jenna Cardigan with ruffle at the hems, black sweater knit 
    10. My Image magazine Fall/Winter drapey trousers, black brushed poly/rayon twill
    11. Angela Wolf Flared Trouser Jeans, beige stretch cotton twill 
    12. Boatneck tee with 3/4 length sleeves, black and white lycra jersey 

    I'm not sure how likely it is that I'll get all of these done, but I already have the fabric pulled and the Extras flow really nicely with the pieces I've got planned for my Queen of Dots SWAP.  I can also adjust them for the spring/summer season by adjusting the length of the sleeves, hemlines and necklines.

    Time to get sewing!!


    Friday, January 19, 2018

    #makenine2018

    I wasn't originally going to take part in the Make Nine project this year.  Despite my love of SWAPs, I don't really like being tied to specific patterns as I am more of an intuitive sewist - meaning I sew how I feel.  If I feel like sewing a bathing suit in the middle of winter, then I'll sew a bathing suit.  If I feel like sewing a parka in the middle of summer, I'll do that too.  Then, this morning, while scrolling through my Instagram account, I totally got caught up in all the beautiful plans people are posting and the next thing I knew, I had a list in my bullet journal of the nine patterns I want to include in my sewing plans for this year.

    #1.  Toaster Sweater, Sew House Seven (found here)

    The Toaster Sweaters (PDF or Paper Pattern)
    photo credit: www.sewhouse7.com

    I have seen so many beautiful comfy looking makes of this pattern that I just can't help jumping on this bandwagon.  I need to improve my lounging game from flannel pants and a ratty old sweatshirt and this fits the bill nicely.  I already own this pattern, which is a plus.  My first planned version of this will be in grey heathered terry.

    #2.  Ultimate Trousers, Sew Over It (found here)

    Ultimate Trousers Sewing Pattern
    photo credit:  www.sewoverit.co.uk
    I am a huge fan of Lisa Comfort, and I've sewn a few of the Sew Over It patterns in the past. In fact, there are very few patterns from SOI that I don't own.  These have been on my list for-EVAH.  2018 is the year I'll finally get around to sewing them.

    #3.  Ella Blouse, Sew Over It (found here)

    Sew Over It Ella Blouse Sewing Pattern
    photo credit:  www.sewoverit.co.uk

    Read what I wrote for #2.  Ditto.

    #4.  Fenway Bra, Orange Lingerie (found here)

    Image result for fenway bra
    photo credit: www.orange-lingerie.com

    I've owned this pattern since it came out too, and I've been putting off sewing it because of the perceived  angst I'd have to go through in order to get it to fit just right.  I'm now envisioning all of the lovely pretty lingerie I could have if I just got over the angst-y part of it.  I'm also riding the high on my recent success with my Boylston Bra makes (view here) so I figured I should give it a go!

    #5.  Lander Pants, True Bias (found here)

    Image of LANDER PANT & SHORT (PDF)
    photo credit: www.truebias.com

    I don't currently own this pattern, but I'll gladly go off my self-imposed pattern buying ban because...LOOKIT those pants.  Every pair I've seen have been SO cool.  And the options for a cropped pair and shorts!  And I want to do the #landerpantsdance!!

    #6.  M7387  McCalls Shirt Dress (found here)

    photo credit: www.mccallpattern.mcall.com
    View C with a shirt-tail hem, in light blue chambray, please!  Seriously, I've been fantasizing about a chambray shirt dress for a very.long.time.  Am I the only one to use the word "fantasize" when referring to sewing dreams?  Ahem...anyway...

    #7.  Beverly Twisted Bikini, Named Clothing (found here)

    Image result for beverly bikini
    photo credit: www.indiesew.com

    Every girl needs a cool bathing suit.  One that makes her feel comfortable and sexy.  And wearing something different than everyone else on the beach.  This looks like it has a lot of potential for meeting those needs for me!  I own this pattern already, which is also a plus.

    #8.  KS3764, KwikSew (found here)

    photo credit: www.kwiksew.mccall.com
    The Iconic Moto Jacket.  I've been dreaming about this one too.  I even have the red faux leather (vegan leather?, pleather?) in my stash awaiting it's moment.

    AND...last but not least...

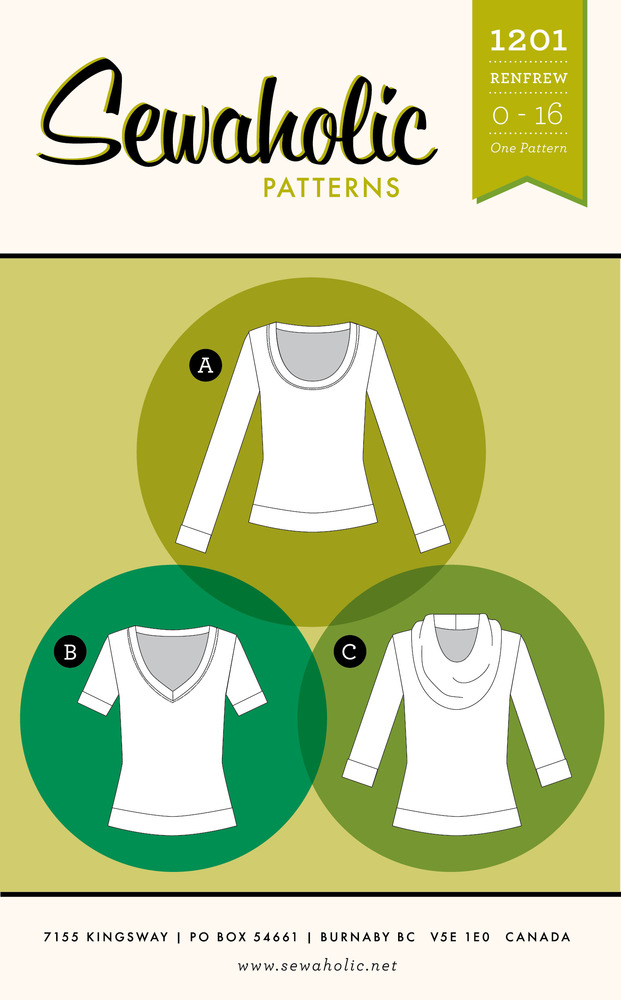
    #9.  Renfew Top, Sewaholic (found here)

    Image result for renfrew top sewaholic
    photo credit:  www.sewaholicpatterns.com

    I have a lot of self-made tee shirts, from a lot of different pattern companies.  While I adore my most recent makes from my beloved Agnes tee pattern, I have had this pattern kicking around and want to use it too.  While I'm typing this post, it has gone from heavy rain to freezing rain to blustery snow, and version C with it's cuddly cowl is calling out to me!  This is another pattern that will span the seasons, so it doesn't matter what time of year it is when I get around to sewing it!

    **Appendix for things I can't say "No" to:

    A.  I also desperately want to make a fedora-style hat.  We have a local hat shop here in my town that offers classes, and it's been on my list of things to do.  WILL.DO.

    B.  The Esplanade Bra by Orange Lingerie is also on my drool list.  As a strapless bra, it goes beyond angst-y to down right scary in my world of perceived fitting anxieties.  If I can accomplish my first nine, maybe I'll give this a go.

    Image result for esplanade bra

    There you have it.  #makenine2018  Somebody remind me of this post when I'm making my millionth Boylston Bra.

    Monday, January 15, 2018

    FO - McCalls 6873


    You Guys!!!  I've forgotten how much fun sewing for kids can be.  My daughter and her boyfriend are taking my grandson with them to the Dominican Republic for a wedding next week.  There is absolutely no way they'll be able to find a dressy, yet cool for the hot temperatures, outfit for my 11 month old grandson, that won't be terribly expensive and take forever to find at this time of year.  I offered jumped at the chance to sew an outfit for him.

    McCalls 6873
    photo credit:  www.mccallpattern.com


    I found McCalls 6873, which has a cover photo that shows a cute little kid in a very cute little vest and cuffed trousers.  While at my mom's house (yeah, she's a great-gramma!!) over the Christmas holidays, we found the exact match to the fabric in her stash and she very graciously gifted the piece to me for this project.  The fabric is a lightweight cotton seersucker, in white and blue.

    Photo credits:  www.mccallpatterns.com
    Based on my experience of sewing a few things for him recently, I traced off the size medium for both the trousers and the vest.  I made the vest first, lining it in a white linen to help keep him cool in the hot climate.  I did the lower "welt pockets" (fake) but left off the upper one as I was worried it would be too much for his small frame.  It was an extremely quick project - I'd forgotten how quick making baby clothes can be since all the seams are so much shorter than those needed for adult projects!

    The trousers were just as quick to put together.  He has a 9" inseam! I giggled a little when we took that measurement.  The trousers have an elastic waist, and the cuffed hems are straightforward.  The part that took the longest for this project was having to go to my local fabric store to get more elastic to replenish my stash!

    I don't have a photo of him wearing it yet, so you'll have to settle for a photo of it on my cutting table but I promise to update this post when I've got a picture.


    A preview of what's up next on my cutting table:


    Friday, January 12, 2018

    Tadaaaa!!! Boylston Bra

    My first finished sewing object(s) of 2018 is the Boylston Bra by Orange Lingerie.  The pattern can be found Here.  I have sewn a number of Marlborough Bras (also by Orange Lingerie) previously and have tweaked that a little pattern each time I made it.  I decided to start off making those same tweaks to this pattern as it is by the same company, so I assumed they used the same block to draft this pattern.

    Let's step back in time for a little history of my fitting process behind the Marlborough bra.  Somewhere I remember reading that you should start off by using your "normal" RTW bra size. I use the word normal kind of tongue in cheek because really how normal is normal from one manufacturer to another.  Anyway...I digress.  So I started with a 34DD, based on my standard RTW size and when I made my first Marlborough, I found the band size to be way too small.  I added about 3" to the band pattern piece (meaning I added a total of 6" around).  Some of the bras I've made since then using the altered band piece are still a bit too tight through the band size, and others are perfect, depending on the fabrics and elastic I use, I guess.  I also added 3/8" total to the fullness of the cup over the bust apex area by splitting the cup and pivoting each piece a bit to add some fullness but leaving the underwire seam length the same.

    So...back to the Boylston bra.  For the first one, I used a zebra print lightweight georgette crepe-y fabric (yeah, technical term, that) for the cups, bridge, frame and fabric portion of the straps.  I was worried it would be too lightweight without any underlining, but it worked out fine.  I'm still worried it may not handle well over the long term, but as this was only to be wearable muslin which may or may not work out, I wasn't too concerned about the long term.  I used black powernet for the back.  The elastics were from my stash.


    I also used cut and sew foam for the cups.  I've found with my Marlborough bras that don't have any padding, you can see if I'm cold, ifyaknowwhatimean.  This is okay if I'm wearing a heavy sweater, or giant scarf over my chest, but I'm not comfortable with the possibility of the "headlights" look generally (12-year-old-boy-from-the-1980s reference that!) Digressing again...In any event, I've decided for the most part, my bras will have cut and sew foam in them.  I followed Beverly Johnson's Craftsy class on sewing bras with foam (found here), Emerald Erin's videos on YouTube (found here)and Cloth Habit's tutorial to draft and construct the foam cups and covers (found here).


    My first Boylston bra turned out quite well.  I'm wearing it today, and it's a tad tight through the cups and the band and the strap placement at the back feels a little too far off centre, but otherwise, it's a lovely bra, and way better in the fitting and comfort department than the RTW bra I was wearing yesterday!


    I've already completed a second Boylston bra, adding another 1/2" to the band pattern piece (another total inch to the band - this would be 7" added in total).  I also moved the back strap placement about 3/8" towards the centre back, and added a little more to the cup seams at the apex on the inner and outer lower cups as well as the upper cup.


    For this one, I used a leopard print georgette for the outer cup fabric, and a kit in brown from Bramaker's Supply (found here) that came complete with Duoplex for the bridge and frame, powernet for the band, elastics, rings, sliders and back closure.  Somehow, I managed to mangle the cup foam a little during the process and it rolls to the outside on the upper cups a bit.  I think I must have been a bit careless while cutting the foam, and I took another look at the pattern for both the cups and the foam pieces that I had redrafted.  I adjusted the pattern for the upper cup fabric piece, by adding another 1/4" to the seam allowance of the upper cup fabric pattern piece to allow for turn of cloth.  When I cut the next one out, I paid particular attention to cutting out the foam in order to see if it makes a difference.


    And the third time is a charm!  My latest adjustments worked , and the fit on this one is pretty darned near perfect.

    The outer cup fabric, bridge, frame and straps are lightweight cotton seersucker (from my mom's stash), the bridge and frame are covered with stretch lace from my stash, the band is powernet, and the inner cups are from cut and sew foam.  The cut and sew foam, along with the powernet are either from Bramaker's Supply or Emerald Erin (so sorry ladies - I've purchased these items from both of you in the past and can't remember where these exact ones came from!).  The rings and sliders definitely came from Bramaker's Supply.  The elastics came from my stash.


    Next up on the sewing table, a summer "suit" for my grandson, and a dress for my daughter - they're going to a wedding in the Dominican Republic and need some fancy duds!