Friday, June 15, 2018

Deep Stash Diving!

While I love intricate sewing projects that take hours and hours of sewing time and teach me new skills, there are times when I just love to hear the whir of the sewing machines as I blast through a project or two.   This was the case recently when I only had a short period of time in the sewing room, and I'm working towards some deadlines and wanted some new clothes.

I chose a few TNT patterns and one relatively straightforward project for a new outfit.  And here's the result!


So let's start with the cardigan.  It's the Blackwood Cardigan from Helen's Closet.  I've made this pattern four or five times already and wear the cardigans to death, literally - one looks a bit like a rag already.  I didn't refer to the instructions at all - it's a super easy make.  I love the lines of it, it makes me feel svelte and sophisticated.  The fabric is a really unusual lacy sweater knit that kind of looks like velour in the raised lacy bits with just enough stretch to make my standard size work.


The top is another pattern I've made multiple times, New Look 6068.

Image result for new look 6068 

This is a picture of the pattern cover that I snagged off the internet because my copy of the pattern is beaten up and written on with so many notes about fitting.  I've had my copy for at least five years, which is as far back as my notes on the cover date.  I've made this top over and over again - I'm pretty sure I've made all versions of it.   It's a classic silhouette. It has a centre back seam, which I love because I have such a swayback that it really helps with the fit.  I added 2" to the length as I found the original pattern a bit on the short side (and I'm short-waisted).  I cut this out in a single layer to pattern match as much as possible with my very small yardage. The fabric is an ITY knit, which is old, old, old stash - I have no idea where I bought it or when.  It was a very small piece, which makes me think I may have picked it up as a remnant. 

I used 2" wide self-fabric bands cut on the cross-grain to finish the hems at the neckline and the armholes. To do this, I fold the fabric strips in half wrong sides together, and stitch them to the right side of the garment, using a 5/8" seam allowance (the regular seam allowance on the original pattern).  Then I turn the seam allowance to the inside of the garment and press.  Super simple, but I think it adds a level of sophistication that the turn and stitch hems don't. 


And finally, the skirt. I wanted something a little casual.  In the warmer months, I wear skirts instead of shorts, especially when I"m travelling.  I find skirts to be cooler and more dressy than shorts.  I chose Vogue 7805, which is reminiscent of jeans styling.  I believe it is out of print as I can't find it on the Vogue website.  As an aside, I love the detailing on the leg of pants and the vents and have added these to my list of "want to makes".


I chose a sage/olive green very stretchy cotton/lycra fabric.  Because the fabric was so stretchy, I sized down a size from my normal 16 to size 14.  I ended up taking in the side seams substantially - again because the fabric was so stretchy.  I really like how the front carriers are integrated into the patch pockets.  The waist is finished with a facing that is topstitched at the bottom, which adds another cool detail.  I used a "jeans" button that is hammered into place to carry through the jeans styling.  It looks a little wrinkly in the photographs, but  I think that's a result of my flash because it doesn't look that way IRL.  It turned out to be a very fitted skirt but that's the silhouette I was looking for.


These pieces will be coming with me in my carry-on bag for my upcoming vacation.  I think they'll work really nicely with the other pieces in the Spring in Prague collection.

Monday, June 11, 2018

It's All about the Base

Sometimes I have a make that I'm not too sure about.  I fall in love with an idea during the concept phase, but when it comes to reality, it just doesn't come out quite the same as the vision in my head.  My latest make is something like this.

I had a length of fabric leftover from my latest makes on my cutting table, the same olive green lightweight cotton/lycra jersey.  These makes turned out pretty great, IMHO.  So, I figured instead of putting it back in my overflowing stash, I would just use the fabric up. 

I chose McCalls 7441 because I fell in love with the drape at the back.  I was originally thinking I'd make the view D vest, but when I laid out the pattern pieces, I didn't have enough fabric left, so I chose View A instead.

And here's how my version turned out.


It's ok, but not amazing.  It feels a bit uninspired to me.  I'm not sure why, maybe the fabric is a bit too stiff for this particular pattern?  I'm usually pretty good about being able to match fabric to patterns, so I'm struggling with why I'm not loving this make.


The back drape requires some futzing to get it to sit "nicely."  But the maybe the real reason I'm not loving this make is the side view:


The fabric settles on my butt, and not in a flattering way.  I'm not taking this with me on my trip, but it is cozy to wear, so I'm sure it will be put into rotation with my in-home lounge wear.  Onwards and upwards to my next make.

Friday, June 8, 2018

Flutter-by

I'm well on my way to finishing the Spring in Prague SWAP, which is good, because my travel date is fast approaching!  My latest FO is a top from New Look 6648.

Image result for new look pattern drapey top

I chose View C with the wrap front and flutter sleeves.  I must have misplaced the waistband pattern piece the last time I sewed this as it wasn't in the envelope with the other pattern pieces, so I drafted one that I thought would be similar.  As luck would have it, I found the pattern piece tacked up to my bulletin board in my Atelier after cutting everything out, and it was remarkably similar to what I had suspected it would be.


My self-drafted waistband turned out to be longer than the pattern piece, but I really like it this length, which hits at the high hip.  I used the same olive green lightweight cotton/jersey that I used for my last make, the Infinity Dress.


I will definitely have to wear a cami underneath to keep the girls from showing themselves, but I like using camis as an accessory and to add a hit of colour.  And it has a great neckline for statement necklaces, which I love!


I finished the neckline with a self-fabric strip instead of the turn and stitch hem they recommend.  I just like this style finish better.  The pictures show a bit of wrinkling, but mostly because I've lightened the photographs to show the details better.

I love the loose style and feminine sleeves!

Monday, June 4, 2018

To Infinity and Beyond!!

There's a lot of buzz about Infinity Dresses on the interwebs these days. (See what I did there?  That's a Toy Story pun for those of you who are uninitiated...)  They make amazing travel pieces.   There are a number of different variations of Infinity Dresses, but I chose Butterick 5606.Image result for butterick 5606
B5606 uses a tank style dress as the "base", with an a-line skirt.  This is great for touring Europe as I can cover my shoulders if I'm going into churches or need to be more respectful.  I also can make it a bit less covered up if it is hot outside or if I'm going out for dinner.


This literally took me about an hour to complete the sewing.   I cut the size medium.  I used a lightweight cotton/lycra jersey in an olive green colour.  The ties are left raw (no sewing required!).  Next time, I'm going to use strips of self fabric to finish the neckline and armholes, instead of the turn and stitch method they suggest in the pattern.


You can wrap the ties in many different ways to change up the looks.


You can even turn the dress back-to-front to create even more looks.


I know  there are even more looks I can play with.  I will certainly be making more of these in different colours, as well as mixing up the styles - with a bandeau top, varying the skirt lengths and styles.  The best part is that it can be rolled up into your suitcase to go with you on the road!  I'm off to search my stash for more knits!

Friday, June 1, 2018

It's Not Cake, but I Like It Anyway

I love cake.  With frosting.  The flavour doesn't really matter, but I do have a special place for chocolate cake with mocha buttercream frosting.  But if you eat cake with frosting all the time, you don't feel very well.  I also love sewing "cake."  You know, the pretty cocktail dresses, the gorgeous over-the-top dramatic jumpsuits, the embroidered motorcycle jackets, and the wild sparkly tops.  But if you sew them all the time, your wardrobe won't feel very good either.

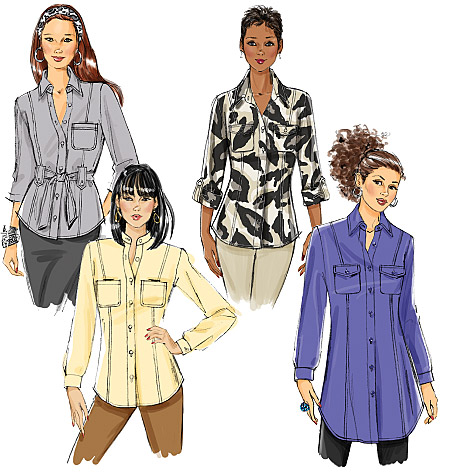
In that vein, I've been working on a couple of basics for my travel wardrobe.  My latest make is another Butterick 5678.  I love this shirt pattern! 

Image result for butterick 5678
I cut size 14 with a bit of extra room at the waist, using the D cup shirt front and side front.  The patterns with the specific cup sizes save me from doing the alteration myself and are a real time saver!

I chose a natural colour medium weight linen, as this will be a multi-purpose shirt jacket on my upcoming trip.  Because it's linen, it wrinkles like nobody's business, but it's linen and it's supposed to.  I'm comfortable with that.


The princess lines are very flattering, and the folded and top-stitched front band makes it super easy to put together.


The back also has princess seams, which makes the fit very flattering.  I did a 1" swayback adjustment to make it fit me better.


It's not cake, but it will work really well within my Spring in Prague SWAP travel wardrobe, and I'm sure I'll wear it a lot!

Monday, May 28, 2018

Get Down with your Bad Self

Oh my gosh, you guys!  I had so much fun with this next make.  I have had this pattern in my stash for ever and ever, literally - I think I picked it up when it first came out.  But for some reason I kept putting it off because I thought it was hard. I used to sew wedding gowns and alter prom dresses.  Why on earth would I think that making this pattern would be so hard??  I stalked the reviews at Patternreview.com and finally worked up my nerve to include it as part of my #makenine2018 just to get it off my #scarypatternlist.

Yes, this is the iconic Kwik Sew 3764 motorcycle jacket.

I chose an olive green stretch cotton twill that I've also had in my stash forever and ever.  I have no idea where I bought this from, or even how long I've had it.  I'm pretty sure it's embarrassingly old - like so old I think I moved it from my old house.  And that was almost 10 years ago.


The zippers are new, from my local Fabricland chain store.  The snaps are also new.


I made my usual swayback adjustment to the pattern and lengthened the sleeves by 1".


During the making process, I decided to narrow the shoulders by about 3/4".  They're still plenty wide, which is the style of the jacket.  You'll also note the gorgeous embroidered rose applique on the left sleeve near the hem.  I blame a friend of mine who showed up at our most recent sewing retreat this past winter for introducing me to these.  I bought mine from Amazon.ca here.


The sleeve vents weren't hard at all - the instructions were very easy to follow, and turned out pretty good, if I do say so myself.  I think the hardest part was inserting the snaps.  The directions on the packet said to try it on a scrap of fabric first.  Of course, I knew better and went gangbusters to the first snap on the epaulet.  And...if course, I dinged the part that holds the snap together with the hammer and it almost didn't close.  I used said hammer to bang the two pieces together.  At least it isn't going to be opened and closed regularly, so it's all okay.

The best part of the jacket is...


THE BACK!!!  I used the applique stitch on my machine to sew all of these roses on.  I'd be happier if I did this before the entire jacket was completed, but honestly, I didn't even think of adding the appliques until my friend showed up with hers.  (Thanks Kelli!! I think it really elevates the jacket!)

I didn't add any lining, though if I make this again, I think I will.  It just helps the jacket slip off and on easier.  The fit is also a bit roomier than I would like, but it certainly looks good, if I do say so myself.

The jacket turned out great, especially because I thought it was so scary before I started.  #sewinggoals I'll consider this a win for both #makenine2018 and my Spring in Prague SWAP!


Friday, May 25, 2018

Pretty in Pink, Round 2

It seems that I've been drawn to pretty feminine things this spring, and pink seems to be a common theme.  I was attending the annual End of Year Awards Banquet for our local Ski Patrol zone and I wanted something feminine, swooshy and pretty to dance the night away in.  After a lot of consideration and looking at a lot of patterns, I chose McCalls M6893.


I was really drawn to the halter style and the pretty overlay-style front bodice.  I chose  a mish-mash of the styles, using the halter style top with the shorter gathered a-line skirt.  I used a very feminine pink polyester chiffon for the outer layer of the dress that I purchased at Fabricland on a recent trip in Ottawa, a hot pink rayon challis for the bustier component (also from the Ottawa Fabricland), as well as the underlayer of the skirt.  


I underlined the rayon challis for the bustier, the waistband and the neckline closure with fusible interfacing.  I lined the dress with a lightweight pink polyester I had in my stash.


Spoiler alert - I didn't finish this in time for the banquet and ended up wearing another dress that I made a number of years ago but have worn less than a handful of times.  I made this decision early enough in the process and was able to stop stressing and enjoy the construction the rest of the dress (as well as the day of the banquet instead of stressing about getting it done!).


I cut a size 16, with an 1" FBA, and a 3/4" sway back adjustment, but ended up taking another 1/4" off the back during the fitting process.  I lengthened the skirt pieces from the original pattern by about 5", but then cut off about an inch to even the hem out while hemming.  

I added a bit of clear elastic to the inside at the top of the bustier from the side seam to just shy of the princess seam, as well as boning in the side seam of the bodice to add support.  I also stitched in bust cups to the lining so I wouldn't have to wear a bra.  I hate it when I'm constantly fiddling on the dance floor to keep the bra from showing at the lower back neckline of the halter.  I also added a waist stay to help keep everything in place.

I used French seams for the chiffon layer of the skirt, and all three layers are hemmed using a picot serged edge. I wanted something light and floaty for the hem to keep the layers from being dragged down.


I am so happy to see the finished fun and flirty dress on my dressform and can't wait to find the right occasion to wear it to!